Writing Up a Science Experiment: What You Saw vs What It Means
Many pupils know what happened in an experiment but lose marks because their write-up mixes up what they saw with what it means. A good science write-up keeps those two things separate. First it reports the observation: what you saw, heard, measured, or recorded. Then it explains the conclusion: what that observation suggests and why. That separation shows the examiner that you can observe honestly and think clearly, not just remember a result. This article gives a short, structured format for writing up school experiments, with examples you can use in class tests and homework. For more on fair tests, see [observation and hypothesis](/blog/science-observation-hypothesis-method.html) and the [solved notes](/books.html).
The Short Structure That Works Every Time
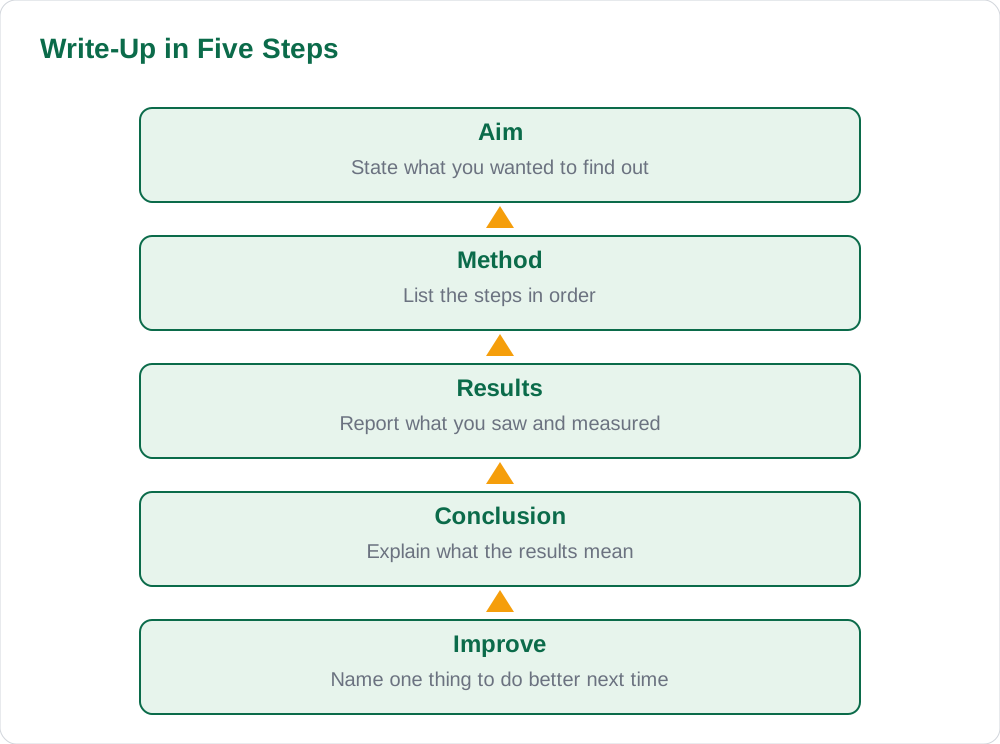
A school experiment write-up does not need to be long, but it does need a clear structure. Start with the aim, which is one sentence saying what you wanted to find out. Then write the method in short steps, saying what you did in order. Then record the results, which are the observations and measurements you actually made. Then write the conclusion, which explains what the results mean. Finally, add one line about what you would improve next time. That five-part structure, aim, method, results, conclusion, and improvement, works for almost every school experiment and keeps your answer organised under exam pressure.
Each part has a different job. The aim and method let someone else repeat your test. The results let them see what happened without your opinion mixed in. The conclusion lets them see your thinking. The improvement shows you understand that no experiment is perfect. If you skip the method, the reader cannot tell whether the test was fair. If you skip the results and jump to the conclusion, the reader cannot check your thinking. Keep each part in its own paragraph or heading so the examiner can find it quickly. Neat headings are not decoration; they are part of clear scientific writing.
- Aim: one sentence saying what you wanted to find out.
- Method: short steps in order, so someone else could repeat the test.
- Results: what you saw and measured, without opinion.
- Conclusion: what the results mean, plus one improvement.
Results: Report What You Saw, Not What You Hoped
The results section is for facts, not opinions. Write what you saw, heard, smelled, or measured, using numbers where possible. For example, the plant in sunlight grew 4 cm in two weeks, while the plant in shade grew 2 cm is a result. The plant in sunlight grew better is not a result; it is a judgement that belongs in the conclusion. Similarly, the bulb lit when the switch was closed and went out when it was open is a result. The circuit worked well is a conclusion. Keeping this distinction sharp is the most important skill in this article, and it is what examiners reward most.
Tables and simple drawings help results stay clear. A table with time, conditions, and measurement lets the reader compare repeats at a glance. A labelled diagram shows the setup without a long paragraph. Use the same units every time, such as centimetres or seconds, and include the unit in every measurement. If a result surprises you, report it anyway. A surprising result is not a failure; it is evidence. Hiding it to match the expected answer breaks the honesty that science depends on. The article on diagrams and labelling shows how to make results diagrams clear and exam-ready.
- Write facts and measurements, not opinions, in results.
- Use tables for repeated measurements and simple diagrams for setups.
- Include units with every measurement, every time.
- Report surprising results honestly; they are still evidence.
Conclusion: Explain What the Results Mean
The conclusion answers the aim. It says whether the results supported your hypothesis, partly supported it, or did not support it, and it gives a reason linked to science you have learned. For example, the results supported the hypothesis because the plant in sunlight grew taller, which fits the idea that sunlight helps plants make food is a conclusion. It connects the evidence to an explanation. A weak conclusion only repeats the result, such as the plant in sunlight grew taller. A strong conclusion explains why that result matters and what it suggests about the idea being tested.
A good conclusion also stays honest about limits. If the test was short, or if one plant was near a window that was sometimes open, say so. That honesty does not lose marks; it shows you understand fair testing. End the conclusion with a next step: what would you test next, or what would you change to make the test fairer. For example, next time I would use three plants in each condition and keep the water exactly the same is a strong ending. It shows you are thinking like a scientist, not just finishing an answer. More on fair tests is in the states of matter guide, where clear comparisons matter.
- Answer the aim: did results support the hypothesis or not.
- Link the evidence to a scientific reason.
- Admit limits honestly, such as short time or uneven conditions.
- End with one clear next step or improvement.
Language That Keeps Observation and Meaning Apart
Simple language choices keep your write-up clear. In results, use verbs of seeing and measuring: I observed, I measured, I recorded, the thermometer showed. In conclusions, use verbs of thinking: this suggests, this supports, this means, the evidence shows. Avoid vague words such as better, nice, or good in results, because they hide the measurement. Instead of the plant grew better, write the plant grew 4 cm compared with 2 cm. Instead of the bulb was bright, write the bulb lit clearly and stayed lit for the whole test. Those concrete sentences are easier to mark and easier to trust.
Past tense works best for most write-ups, because you are reporting what you already did. Write I measured the height each Monday, not I measure the height each Monday. Keep sentences short. One idea per sentence is enough. If a sentence grows long, split it into two. Read your write-up aloud before handing it in. If you cannot tell where the results end and the conclusion begins, add headings or split the paragraph. That quick read-aloud check catches many mixed-up answers before the examiner sees them.
- Results: observed, measured, recorded, showed.
- Conclusion: suggests, supports, means, shows.
- Replace vague words with numbers and concrete descriptions.
- Use past tense and short sentences; read aloud to check.
A Worked Example You Can Copy in Structure
Here is a short worked example using a plant test. Aim: to find out whether plants grow taller in sunlight than in shade over two weeks. Method: two similar plants were used, one placed in sunlight and one in shade, with the same soil, pot, and water. Height was measured from soil to tallest tip each Monday. Results: the plant in sunlight grew from 10 cm to 14 cm, while the plant in shade grew from 10 cm to 12 cm. Both plants were watered with the same amount. Conclusion: the results supported the hypothesis, because the plant in sunlight grew taller, which fits the idea that sunlight helps plants make food. Next time, three plants in each condition would make the result more reliable.
Notice how the example keeps each part separate. The results give numbers without opinion. The conclusion interprets those numbers and names an improvement. You can copy this structure for any school experiment: a drying cloth test, a dissolving salt test, a trolley test, or a circuit test. Change the aim, method, and results, but keep the same five-part shape. With practice, the structure becomes automatic, and you can focus on the science instead of worrying about how to start. For more everyday experiments, see the forces and motion guide.
- Copy the five-part shape for any school experiment.
- Keep results as numbers and facts, conclusions as meaning.
- Name one improvement in every write-up.
- Practise the structure until it feels automatic.
AI Help: Muse AI
Muse AI is Meta's personal AI assistant, and it can help you turn rough experiment notes into a clear write-up by separating what you saw from what it means.
Join Muse with invite code LTGSWD — in the Muse app, go to Settings > Redeem token and enter the code.
Disclosure: LTGSWD is the author's Muse invite code.
Muse AI does not give official STBB answers — always verify against your Sindh Textbook Board book and your teacher.
5 key points you must know
- A write-up needs aim, method, results, conclusion, and one improvement.
- Results report facts and measurements; conclusions explain what they mean.
- Use tables, units, and clear diagrams to keep results trustworthy.
- Honest limits and surprising results strengthen a write-up, not weaken it.
- Past tense, short sentences, and headings keep science writing clear.
Frequently asked questions
What is the most common write-up mistake?
Mixing results and conclusions. Pupils write the plant grew better in the results section, which is a judgement, not a measurement. Results should give the numbers, such as 14 cm versus 12 cm, and the conclusion should explain what those numbers mean.
How long should a school write-up be?
A short, structured write-up of five paragraphs or headed sections is enough. Aim for clarity, not length. A page with aim, method, results, conclusion, and improvement beats three pages of mixed-up description.
Should I include a diagram in my write-up?
Yes, when it helps show the setup or the results. A simple labelled diagram of the apparatus makes the method clearer. Keep label lines straight and labels short, as explained in the diagrams guide.
What if my results did not match my hypothesis?
Report them honestly and say the results did not support the hypothesis. Explain what you think happened and what you would test next. A write-up that reports a disagreeing result clearly earns more marks than one that hides it.
What tense should I use in a write-up?
Use past tense for what you did and saw, such as I measured the height each Monday. Use present tense for general science ideas, such as sunlight helps plants make food. That mix is standard in school science writing.
Solved notes — preview free
These guides work best with the solved exercises. Preview the solved notes free on this website — 119 solved notes for Classes 6–10 in Sindhi, Urdu, English and Arabic medium. Or browse the full solved notes catalogue for your class and medium. New solved notes are added regularly — check the catalogue for coming-soon books.